Using Quicktime Video
>
With Low-End Pro Tools Systems
In my last few columns, I’ve described how to get QuickTime video into your computer and use it with Pro Tools as your video workprint. Today, I’ll talk about how QuickTime video can allow you to use low-end Pro Tools systems to cut to picture. Don’t laugh – it can be done!
Using Pro Tools Free and LE To Do Real Work
Digidesign offers a number of very inexpensive versions of Pro Tools. While these low-cost entry-level systems don’t offer many of the features found in the TDM/MIX systems, they all allow the use of QuickTime video. Now, for as little as the cost of a Mac PowerPC computer, you can cut sound to picture. You don’t even need a Fuse card, if you can get the video pre-loaded for you.
This opens up all sorts of possibilities. Here’s an example: Joe is an ADR editor at Fred’s Sound Editorial. Joe goes into work and, using an inexpensive FireWire drive, makes a copy of the session, all the loaded takes, the guide track, and the QuickTime video. He then goes home, loads the session into Pro Tools Free 5.0, which he downloaded from the Digidesign website, and starts cutting using the built-in QuickTime display for his video reference. His total cost to get set up? Less than $1,400 for a used blue and white G3, a monitor, a medium-sized portable Firewire drive, a pair of headphones, and the free version of Pro Tools.
Of course, this is the barest of bare bones systems, and most editors will find it too limiting, but it is a workable solution for light editorial tasks. A more realistic approach would be to move up to the Pro Tools Digi 001 system, which includes Pro Tools version 5.1 LE and an Aurora Fuse card. Add these to last year’s model G4, and you can get a 24-track system up and running for just about $3,000.
Don’t be Penny-Wise and Dollar-Foolish
Before you dash out and pick up one of these low-end systems, you should be aware of some important caveats and evaluate the systems based on the work you need to do.
First and most important are the restrictions on the number of tracks that these lesser systems can handle. Pro Tools Free only allows eight tracks; if you open a session with more than eight, the higher-numbered tracks are permanently deleted. Also, the free version supports Pro Tools sessions only up to version 5.0.1, which means it can handle only mono tracks. If you
 |
|
|
Figure 1. |
|
Pro Tools LE 5.1 supports 24 tracks in both mono and stereo, but it has no surround features. All surrounds, and any tracks above the first 24, are deleted. If you’re opening a TDM/MIX project in LE or Free, make sure that your material is on the appropriate tracks.
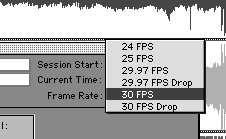
Pro Tools Free and LE cannot be set to pull-down mode, so if your main session is 29.97 frames per second pulled down, set it to 30 while in LE or Free, then back to 29.97/Pull Down in your TDM system. 30 without pull down and 29.97 with pull down are functionally the same – the number of samples per frame is identical (figure 1).
Because the Mac’s built-in audio does not support 48KHz sample rates, neither does Pro Tools Free. So if you are working at 48KHz, the free version is not really an option for editing. However, here’s a neat little trick: If you open an existing 48KHz session in Pro Tools Free, you’ll see that Pro Tools Free will "think" that it’s running at 48KHz. This will allow you to use it to do things like converting 44.1 audio files to 48, or other non-editorial tasks. Do note that although the session setup indicates 48KHz, you are still running at 44.1, so everything will play back 8 percent slower.
Because the Mac’s built-in audio does not support 48KHz sample rates, neither does Pro Tools Free. So if you are working at 48KHz, the free version is not really an option for editing. PT Free will open it and it you can do some work on the session, but it will play 8 percent slow.
The Truth about Feet and Frames
The Free and LE versions don’t have "Feet + Frames" or regular timecode displays in the session. To work around this, make sure you have visible timecode and feet and frames burned into the video. The lack of a feet and frames display will make conforming to change
 |
|
|
Figure 2. |
|
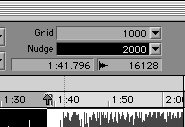
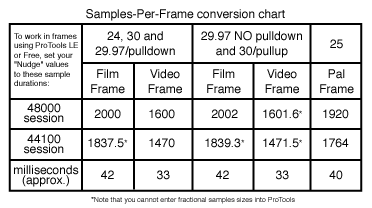
As an alternative to timecode, you can use milliseconds and samples. To facilitate this, set the session start time (in the Session Setup window) to an exact hour, such as 2:00:00:00 for Reel Two. Then set the time display to "Mins:secs." The minutes and seconds in the display will now correspond exactly to those on the video. For moving or nudging by frames, set the nudge factor to Samples, then (assuming a 30 non-drop project) 2000 samples will exactly equal one film frame (figure 2), and 1600 samples will exactly equal one video frame. Figure 3 contains conversion values for samples, milliseconds, and frames.
If you’re familiar with the Waveframe, you’ll find the preference for "shuttle" mode using the numeric keypad a welcome addition to Pro Tools TDM systems. Unfortunately, LE and Free don’t have this. Further, LE and Free lack "Commands Key Focus." This feature turns each letter on the keyboard into a single-keystroke command. (Charles Maynes --dead article link--(EditorsGuildMagazine/NovDec01/tip_pro_tools_maynes.html))
 |
|
Figure 3. Timecode displays aren’t available in these low cost programs. As an alternative, you can use milliseconds and samples. |
Even with these limitations, the very low price of these systems makes them a tempting choice for the budget-conscious. And the savings extend beyond the basic system. For example, you can use cheap internal ATA drives and FireWire drives, instead of spending big bucks on the SCSI card and drives that Digidesign recommends for the full version of Pro Tools. (While it’s not officially supported, I have used internal ATA and external FireWire drives on a fully blown TDM system with no problems.)
An Edit Suite at 35,000 Feet
Here’s one application of Pro Tools Free that you can’t pass up: Load it into a PowerBook and take it with you to the ADR session at a far away location. Then, on the flight back, load the session on your PowerBook and have all that ADR cut by the time you land. But be careful. It’s now possible to edit anywhere – but wherever you cut, be sure you get paid for your time!
A Portable Foley Stage
All of this gets even more interesting with the many new USB and FireWire audio devices available. Now, instead of going to a foley stage, you can take your favorite foley artist to the location of your choice and record something that really sounds like production. Here’s how:
- Get an Apple laptop. Many iBooks are excellent choices, because they have composite video outputs (more on this in a moment).
- Get Pro Tools Free.
- Get a good quality USB microphone preamp and a good microphone.
- Make sure you have "Apple Audio Extension 1.3.3" installed.
Load a QuickTime video of the film into a Pro Tools Free session, and record foley! You might want to take along a video monitor if you have an iBook with a video output – this will show the computer’s display on the video monitor and make it easier for the foley artist to see the action.
Ultimately, the LE and Free versions of Pro Tools are quite limited, but with QuickTime, they are versatile enough for plenty of basic editorial tasks.
ARCHIVES HOME
