Using Quicktime Video
With Audio Workstations
How Low-Cost
Video Tools Help You Work With Audio
Part
Two (Go to
Part
One)
by Andy Somers
In the last issue, we talked about setting up your Pro Tools systems with Aurora Fuse cards so that you can work with QuickTime video. This is much more responsive – and about 10 times less expensive – than using a traditional video deck.
Once you’ve got your card installed, one of the most important decisions you’ll need to make is how to handle storage. Last time, we discussed using portable drives and removable media to store digitized video. In this installment, we’ll discuss additional storage options and other important issues that that you’ll need to deal with in a facility environment.
Local Internal Hard Drives Connected to a Central Server
This solution is especially attractive if you have a large facility that supports many editors. You set up a single workstation for digitizing, with all of your Macs connected to it via Appletalk over Ethernet. To work on a specific reel, an editor just has to copy it from the server to his or her local drive. Instead of storing dozens or hundreds of tapes, you can hold every version of a feature on a few hard drives in the server.
What’s a Few Pixels between
Friends…
Choosing a
Resolution
Your storage choices will help you determine the resolution to choose. Or perhaps we should say that your resolution choices will help determine the type of storage you need. Resolution and storage are interdependent and you should pick a standard and be consistent throughout the facility.
There are two components to resolution. The first, and most intuitive, is frame size, measured in pixels. With the Fuse card, full-resolution NTSC video is 640x480 pixels. If you want to work at "half" resolution, you’d set your digitizing application to input at 320x240 pixels.
|
|
 |
|
|
|
|
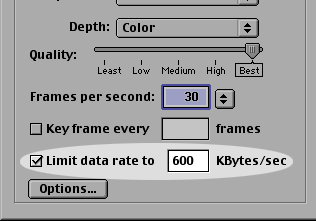
But it is not only the number of pixels in an image that determines its resolution. The amount of compression, or "data rate," is equally important (Figure 1). If you are working at full 640x480 resolution, then you’ll want a data rate of at least 1,500 kilobytes per second, and perhaps as high as 3,000 KB/sec. 3,000 will produce excellent-looking video – it’s actually a higher resolution than most Avid offline outputs. Of course, there’s no point to using such a high data rate if you’re working with a low-res Avid output and this level of resolution will eat up drive space quickly! 3,000 KB/sec is three megabytes per second, which means that one gigabyte of hard drive space will hold roughly five minutes of footage. To use your storage more economically, work with a smaller frame size. 320x240 is actually pretty good – as good as many Avid outputs. With this size, you can use a data rate as low as 400 to 600 KB/sec. 600 KB/sec gives us five times more disk space than 3,000 KB/sec. A ten-minute reel uses only about 360 megabytes – small enough to fit on a CD.
There’s another argument for lower resolution, too: networking. Appletalk will not allow the transfer of any file larger than two gigabytes, so each QuickTime movie must be smaller than that. Also, smaller files transfer much more quickly. On a 100BaseT network, a 2 GB file might take several minutes to transfer, but a 360 MB file (ten minutes of video at 600 KB/sec) would transfer in under a minute.
Getting the Guide Track
Extracting
Audio from the QuickTime ‘Mov’
File.
After importing a movie into Pro Tools, you’ll see the "extract audio" feature in the movie menu. While extracting the audio from your Quicktime movie may seem like a good way to get the guide track loaded into Pro Tools, you’ll be disappointed to learn that a track loaded this way may drift in sync. This is because the Mac’s internal sound input does not run at precisely 44.1 KHz, and sync will drift about 1-2 frames in a ten-minute reel. Because of this, you should run a separate pass and load the guide track directly into Pro Tools.
Note that if you are loading from a consumer VHS deck, you should connect the deck’s video output to the Pro Tools video sync input, so that Pro Tools will run at the same speed as the deck. Unless the deck can be genlocked to the same black reference as the Pro Tools, you will still have some sync drift issues. Using the deck’s video out as the sync reference fixes this problem.
That’s Not a Problem — It’s a
Feature!
Working
with Multiple Versions of a Reel
Many editors may want to have two or more versions of a reel available when conforming to picture changes. When working on videotape, it’s a quick switch from one tape to the other to check any changes. But one of the disadvantages of using QuickTime with Pro Tools is that Pro Tools allows only one video to be loaded into a session at a time.
The solution is to use Premiere or Final Cut Pro to join two versions of a reel. Then, in Pro Tools, you’ll have both videos right there –one to cut against and the other as a reference for the previous version.
|
|
 |
|
|
|
|
The procedure goes like this: open your digitizing/editing application. (For this example, we’ll use Final Cut Pro.) Assuming that both the new and old versions of the reel have been digitized, import them into the Browser window (you can drag and drop, or use "Import" under the File menu). Then create a new sequence. Make certain that the sequence you create has the exact same resolution settings as the video clips you are about to join.
Next, drag the new version of the reel to the beginning of the sequence. Then drag in the old version of the reel, dropping it just after the new one. Once you have a sequence containing both versions, you will need to export it in a form that Pro Tools can understand.
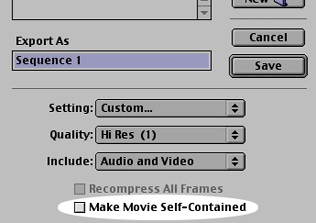
Now, you may say, "Hey! That’ll take forever and double the required disk space!" But it won’t, as long as you export "as reference." This creates something that appears to Pro Tools as a single QuickTime clip, but that actually contains none of the media. Instead, it just references the existing source clips. Exporting this way is not only very fast, it also takes up no additional disk space (Figure 2). To make a reference movie, deselect "make movie self contained" in the Save dialog box.
Additional Tips
- Note that if you are working in
Pro Tools on a 29.97 project that is pulled down, you
should capture your video in Premiere or FCP at 30 fps
– not 29.97. Set this in the capture settings dialog
box (Figure 1). Despite the difference in terminology,
this will play back in sync in Pro Tools.
- If you have a nine-pin
controllable deck, you can use Final Cut Pro’s
machine control to accurately digitize a "handle" at the
head of each reel. You can make that match the start time
of your Pro Tools session, so that you won’t have to
re-sync your video when you import it. For example, if
you are starting your Pro Tools sessions at 1:00:00:00,
and you digitize your video starting at 1:00:00:00, you
shouldn’t need to worry about re-syncing the movie
after importing it.
- The external SCSI ports on older
Macs (those before the blue-and-white G3) are too slow
for most digital video. If you are going to use SCSI hard
drives for storage, they’ll need to be connected to
a faster add-in SCSI card. Material digitized at 600
Kb/sec or less, however, will probably work okay with
older, built-in SCSI.
- One important advantage to using a
Fuse card is that you can work in PAL as well as NTSC.
This is important, because PAL is becoming a popular
format for video intended for transfer to film. With a
Fuse card, you’ll only need a single PAL deck in
your facility, since any Fuse system will be able to
handle the digitized PAL material.
In the next issue, we’ll discuss how to use Quicktime movies in combination with ProTools Free and ProTools LE to create a very cost effective cutting station.
Go to Part Three
Andrew Somers is a Guild member, a picture editor, sound editor, and mixer.
contact him viaGeneral Titles & Visual Effects
Reprinted from
The Motion Picture Editors Guild Magazine
Vol. 22, No. 3 - July/August 2001
ARCHIVES HOME